|
|
|
How often have you passed by antique distributors at a swap meet, because you knew that ignition points and condensers are no longer available?
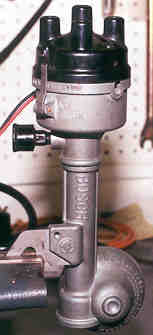
This article explains how to renovate an antique distributor using an IgnitorÔ electronic ignition module. With this system the only external change is the addition of a second low tension wire between the distributor and a conventional coil. No external electronics are required, so it preserves the original appearance of the distributor (see photo at left). Another feature of this system is that the timing is relatively insensitive to shaft wear, so it can be used even if the distributor is too worn for use with points. We have used these modules for Bosch 600 and Atwater Kent LA clip on distributors and for a Bosch front plate distributor. We frequently find antique distributors for the Model T Ford in the $50 to $100 price range. An Ignitor module costs about $70, so for roughly half the cost of a new electronic distributor you can have a period correct distributor updated with modern electronics.
The Ignitor module replaces the points and condenser in the original system, so the first step in the installation is to remove the points and condenser. We have used two types of modules. One employs a magnetic ring and a sensor, while the other employs only a lobe sensor. We describe the general procedure for installing both types of modules.
Magnetic Ring Ignitor
There
are many different Ignitor setups that use a magnetic ring, which slips over the
distributor cam. The primary difference between them is the size of the magnetic
ring and the mounting of the Ignitor module. The module itself is the same. The
figure at left shows a typical distributor cam lobe. Part number 1847A for the
Once
the magnetic ring has been fit to the cam lobe, you must mount the Ignitor
module in the correct position with respect to the ring. Its vertical height,
horizontal clearance and angular position must be correct.
Lobe Sensing Ignitor
The lobe sensing modules come in two basic types depending on the direction of distributor rotation, clockwise and counterclockwise. We have used part numbers 1181 LSCC and 1187 LSCC (both used the same module). The lobe sensing modules are more convenient because they directly sense the distributor lobe without use of a magnetic ring. The mounting procedure for the module is exactly the same as for the magnetic ring module, except that the clearance is set between the module and the cam lobe tip rather than the magnetic ring.
The lobe sensing modules are somewhat taller than the magnetic ring type (about 7/8 inch versus 9/16 inch), which could be a problem in some applications. For example in a Bosch 600 application, we had to remove some material from the base of the rotor in order to mount the module. Lobe sensors also have the minor disadvantage that they require three seconds to charge after the ignition switch is turned on. We have also found that the accuracy of the spark timing from cylinder to cylinder (called spark scatter) may be somewhat less accurate with the lobe sensor than with the magnetic ring Ignitor.
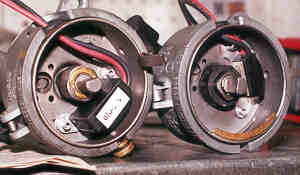
The photo below shows two converted Bosch 600 distributors. The one at the left uses a lobe sensing module, while the one on the right uses a magnetic ring.
Disclaimer
The authors of this article have no affiliation with and receive no financial compensation from Pertronix Inc., maker of the IgnitorÔ . We were motivated to write this article strictly because we would like to see more original accessory equipment in use on our beloved Model T Fords.
|
 Bosch 009 Volkwagen distributor has dimensions A = 0.608 and B = 0.668, while
part number LU-143 for an MGB has A = 0.669 and B = 0.744. An antique Bosch
distributor has almost the same size lobe, A = 0.690 and B = 0.744. If your antique
distributor has a different sized lobe, you can search for an Ignitor with a
magnet ring which fits or you can make modifications to make it fit. If the ring
is too small you can ream out the magnetic ring (a small amount) or cut down the
lobe so that the magnetic ring will fit. We normally turn the lobe in a lathe to
a diameter of B and then manually grind a flat on the sides until the magnetic
ring fits. It is not necessary for the ring to be exactly concentric with the
shaft. If the lobe on your antique distributor is smaller than the magnetic
ring, you will have to build it up, e.g. with epoxy or masking tape. The magnets
are about 0.2 inches long and are near the bottom of the ring, so if the
magnetic ring is too tall, you can cut off the top part of it.
Bosch 009 Volkwagen distributor has dimensions A = 0.608 and B = 0.668, while
part number LU-143 for an MGB has A = 0.669 and B = 0.744. An antique Bosch
distributor has almost the same size lobe, A = 0.690 and B = 0.744. If your antique
distributor has a different sized lobe, you can search for an Ignitor with a
magnet ring which fits or you can make modifications to make it fit. If the ring
is too small you can ream out the magnetic ring (a small amount) or cut down the
lobe so that the magnetic ring will fit. We normally turn the lobe in a lathe to
a diameter of B and then manually grind a flat on the sides until the magnetic
ring fits. It is not necessary for the ring to be exactly concentric with the
shaft. If the lobe on your antique distributor is smaller than the magnetic
ring, you will have to build it up, e.g. with epoxy or masking tape. The magnets
are about 0.2 inches long and are near the bottom of the ring, so if the
magnetic ring is too tall, you can cut off the top part of it.
 As shown in the
figures, the base of the magnetic ring should be aligned vertically with the
base of the Ignitor module and the module should be positioned 0.020 to 0.040
from the magnetic ring. The angular position of the Ignitor, which is called phasing,
must be set so the rotor will be aligned with the contacts in the distributor
cap when the module fires. To determine the correct angular position, first mark
the position of the distributor cap’s contacts on the side of the base. Then
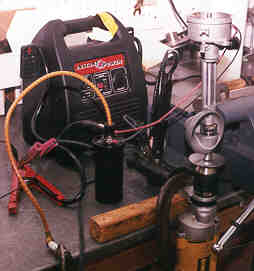
set up a test circuit on your workbench as shown in the
schematic and photo. With the
distributor cap removed, but the rotor in position, turn the distributor shaft
and observe the position of the rotor as the spark plug fires. To get an
accurate spark, make sure you turn the distributor in the same direction it will
turn when it is installed. Adjust the
angular position of the module until the rotor is aligned with the marks
designating the position of the contacts in the distributor cap. Once you have
determined the correct position for the module mount it permanently. Pop rivets
usually work well for mounting the module.
As shown in the
figures, the base of the magnetic ring should be aligned vertically with the
base of the Ignitor module and the module should be positioned 0.020 to 0.040
from the magnetic ring. The angular position of the Ignitor, which is called phasing,
must be set so the rotor will be aligned with the contacts in the distributor
cap when the module fires. To determine the correct angular position, first mark
the position of the distributor cap’s contacts on the side of the base. Then
set up a test circuit on your workbench as shown in the
schematic and photo. With the
distributor cap removed, but the rotor in position, turn the distributor shaft
and observe the position of the rotor as the spark plug fires. To get an
accurate spark, make sure you turn the distributor in the same direction it will
turn when it is installed. Adjust the
angular position of the module until the rotor is aligned with the marks
designating the position of the contacts in the distributor cap. Once you have
determined the correct position for the module mount it permanently. Pop rivets
usually work well for mounting the module.